#3: Rustic Loaf
This country bread is a hit with family, yet simple enough for busy days during the week.
Making bread takes time: in this loaf's case, nearly an entire day. Fortunately, most of the work is up to the yeast.
Rustic Loaf
Ingredients
- 1 1/2 c leaven
- 1 1/2 tsp salt
- 1 c water
- 1 1/2 c bread flour
- 1 c whole-wheat flour
Prepare leaven, set out overnight.
Mix leaven, salt, and water. Continue to stir and gradually add flour until sticky arms of dough begin clinging to the edges of the bowl. Set aside to rest for a few minutes, then perform a first turn. Over the next two hours of the bulk rise, turn on the half-hour as time allows.
Once the dough has doubled in bulk, fold into rough boule, cover, and set aside to rest. Repeat fold on the hour over the next two hours.
Once the dough has risen by half, preheat the oven to 450° with a dutch oven inside. Reshape loaf, and allow to rest until the oven reaches temperature.
Slash bread and bake, covered, in dutch oven for 40m. Uncover and cook for an additional 10-15m, or until crust is golden brown.
There’s just one rule before we begin: bread is forgiving. Gorgeous, airy loaves require time and effort, but a few minutes’ variation in your baking schedule won’t make steaming bread fresh from the oven any less delicious. A long, slow rise can help develop flavor, but quick-rising loaves can turn out very well. Don’t be shy about adjusting the timing of the recipe to fit your schedule!
Adjustment: temperature
The speed of the rise isn’t entirely up to the yeast. Using temperature–broadly, the energy available for the magic happening in the dough–we have some control over the magic’s speed. The warmer the rise–the more energy in the dough–the faster the yeast can work.
Don’t get any ideas. Once the temperature passes ~130°F, yeast will stop working–permanently. But within the comfortable temperatures of a kitchen, we have quite a bit of control over the speed of metabolism. There are two big caveats.
First, yeast aren’t the only variable affected by temperature. The enzymes that convert starches in the flour into fermentable sugars are most efficient around 95°F. Lower temperatures early on in the baking process will limit the amount of sugar available for the yeast and slow fermentation.
Second, the yeast aren’t the only show in town. Dough also plays host to naturally occurring bacteria. At lower temperatures, bacterial fermentation ramps up and contributes a sour, vinegary flavor to the dough. At higher temperatures, bacteria will have minimal impact on the dough.
Enough science. Lower temperature, slower rise. If it just doesn’t come out right, tell us about it and we’ll work it out!
Dawn
My morning begins with a brisk walk to take in the seasons, stretch my legs, and clear my mind for the day ahead. On a baking day, I’ll take a moment or two to schedule baking around the meetings, errands, and other commitments of the day.
It usually works out something like this:
| Time | Task | Prep | Wait |
|---|---|---|---|
| Night | prepare leaven | 5m | overnight |
| Dawn | mix dough | 10m | |
| Morning | bulk rise | 6 x 2m | 2 - 3h |
| Noon | rounding | 4 x 2m | 1 - 2h |
| Afternoon | proof | 2m | 1 - 2h |
| Dusk | bake | 2m | 40m |
In the kitchen, the leaven has taken on the airy, frothy appearance of yeast hard at work. Bubbles rise and break at the surface, and the rubbery mixture clings to itself when stirred.
It’s also about as yeasty, bland and generally unappetizing as it looks.
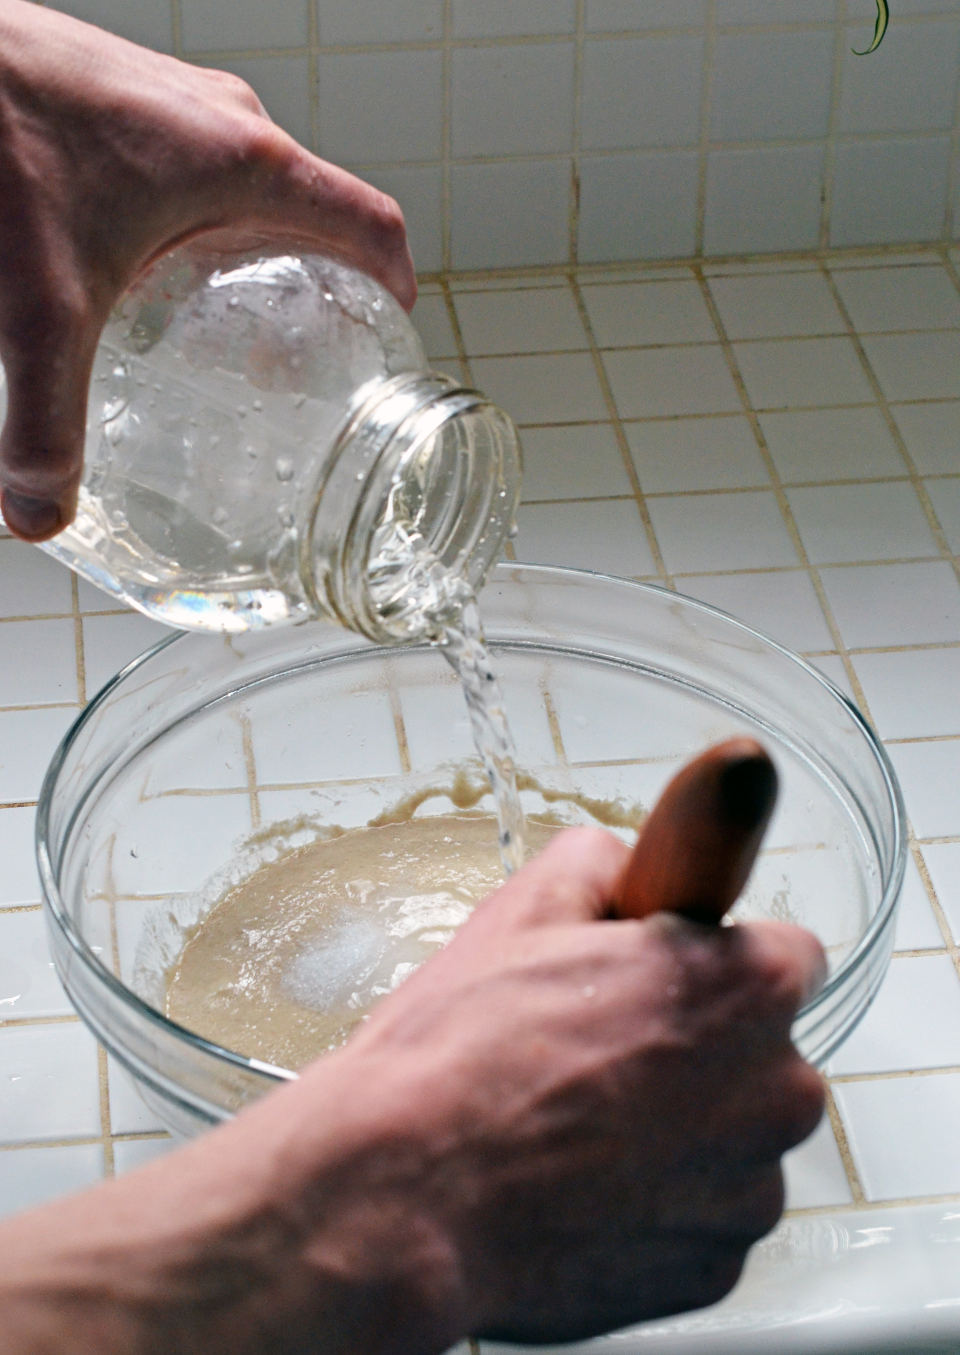
I’ll add a generous pinch of salt to add a bit of flavor, and–since the sticky, glutenous mass will resist our initial attempts at mixing it–a bit more water to make it easier to work. I stir until the starter has the same, even consistency as it had the night before.
Handling the watery dough wouldn’t go very well, so I gradually add flour while continuing to stir. Sticky threads of dough soon begin to stretch from the edges of the bowl and the bulk of the dough starts to hold shape. Once a slight dome remains in the center of the bowl after I scrape down the edges, I set it aside, covered, to rest for a few minutes.
Adjustment: flour
The rustic loaf is very forgiving. Once you start pushing the envelope on temperature, water content, or technique, however, selecting appropriate, high quality flour (I love Bob’s Red Mill for bread flour, and Wheat Montana for pretty much everything else) can help make the difference between fantastic and merely alright.
Morning
The morning sun streams into the kitchen: it’s time to begin tending the bread through its first (‘bulk’) rise. Over the next few hours, we’ll work the dough to develop a glutenous internal network that can contain all gases the yeast are producing.
Remember that the bread is on your schedule and not the other way around? Here comes the tricky part.
Light, puffy loaves depend on a well-formed internal structure. Developing it means work, which means time and attention. Working the dough at regular intervals is great, schedules allowing, but even erratic schedules can still produce tasty loaves.
For the work itself, Chad Robertson, the baking guru behind San Francisco’s (fantastic) Tartine bakery, has popularized a folding technique that gently develops gluten structure while still preserving the texture of the dough. Chad puts it best:
… fold dough by dipping hand in water, taking hold of the underside of the dough at one quadrant and stretching it up over the rest of the dough. Repeat this action 3 more times, rotating bowl a quarter turn for each fold.
I repeat this process at regular intervals over the next few hours, or until the dough risen to half again its original size.
I’ve known bakers to pack dough into portable containers so that they can keep it with them and attend to it throughout the day. Bring your bread to work day–that sort of thing. I won’t recommend it here, but you wouldn’t be the first.
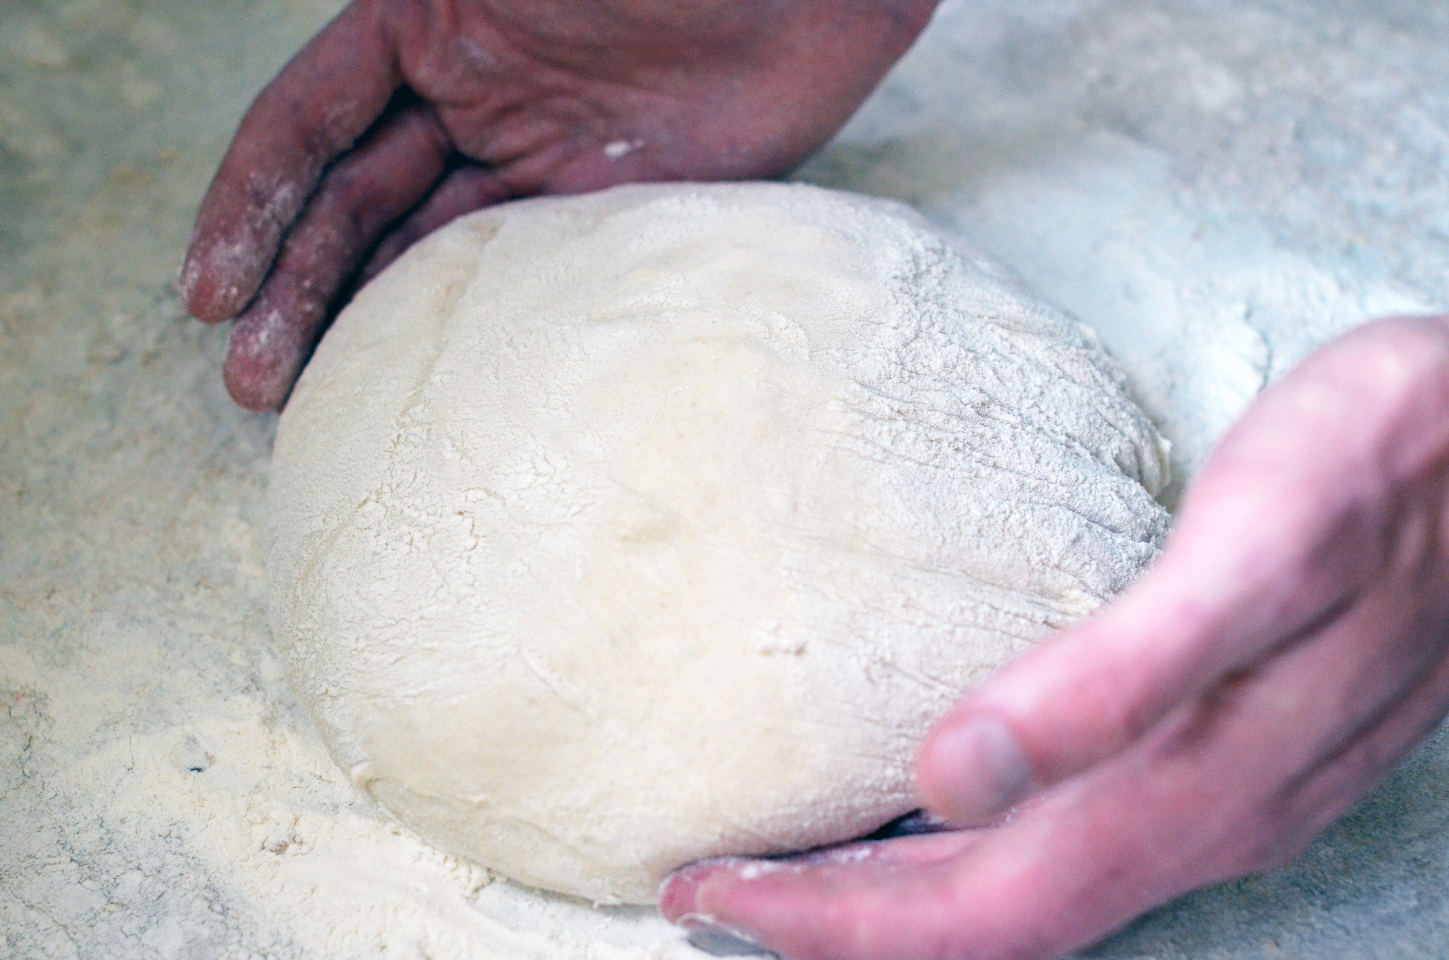
Noon
Using a well-floured hand, I turn the sticky dough out onto a similarly well-floured work surface. Over the next few hours I’ll continue developing structure and tension in the wet dough as my microbial helpers continue the chemical reactions that will lend texture and flavor to the finished loaf.

Once again, manual intervention is required. And once again, the schedule is fairly accommodating. The idea is this: I slip a hand beneath one of the dough’s edges and fold it two-thirds of the way across the top. I repeat this with the opposite side, so that the dough is folded like a letter. I turn the loaf a quarter turn and repeat, folding the letter in on itself. After the two folds, I flip the loaf seam-side down on the counter, and let rest.
On the first pass, I find it
helpful to use a (well-floured) bench
knife to manage the sticky dough. As tension builds in the loaf and
flour builds on the work surface, however–or if a bench knife (or spatula)
isn’t close at hand–you may prefer to just use
your hands.
As I repeat this process several times over the next few hours, the dough gradually begins to maintain its loaf-like shape.
Afternoon
As the sun starts its long descent, I set the resting loaf aside to proof into its final form. Some bakers use a ribbed banneton (well-floured, as ever) to mold tight ridges into the surface of the loaf. Others use a baking couche for the rustic texture of its folds. Returning the loaf to its mixing bowl works, too, and–since it’s handy–I’ll just do that.
I add a bit more flour to the bowl to keep the dough from sticking and gently place the loaf, seam-side up, back into the bowl. I cover it, set it aside, and return in half an hour.
Dusk
Great bread depends on three magical elements: the fermentation provided by the yeast; the development and structure from our hands; and the chemistry of the oven. Now, with the sun hanging rosy over the horizon, it’s time to bake!
In its natural environment, we would bake the rustic loaf in the scorching bricks of a wood-fired hearth. 700°? 800?
But if you’re like me and don’t have a wood-fired oven handy, preheat your kitchen oven to as high as you’re comfortable taking it–at least 450°.
Adjustment: oven humidity
Besides heat, there’s also the matter of humidity. Commercial ovens inject steam during baking to control the water content and thermal mass of the environment, but most of us don’t have them in our kitchens. The ovens we do have are generalist appliances: versatile, durable, but without serious effort (or modification) unable to match the conditions of commercial bakeries.
Never easily deterred, home bakers have discovered an accessible alternative. A closed dutch oven
, pre-loaded with a mister and holding in steam boiled out of the loaf itself, mimics the effects of a high-humidity oven.
If you don’t have a dutch oven handy, you can still bake in the oven itself. If you have cast iron pots and pans handy, loading them around the inside edges of the oven will help preserve the oven’s high temperature even when you open the door. And even if you don’t, you can still bake a delicious–if slightly less crusty–loaf of bread.
 CREDIT: Kirsten Tilleman
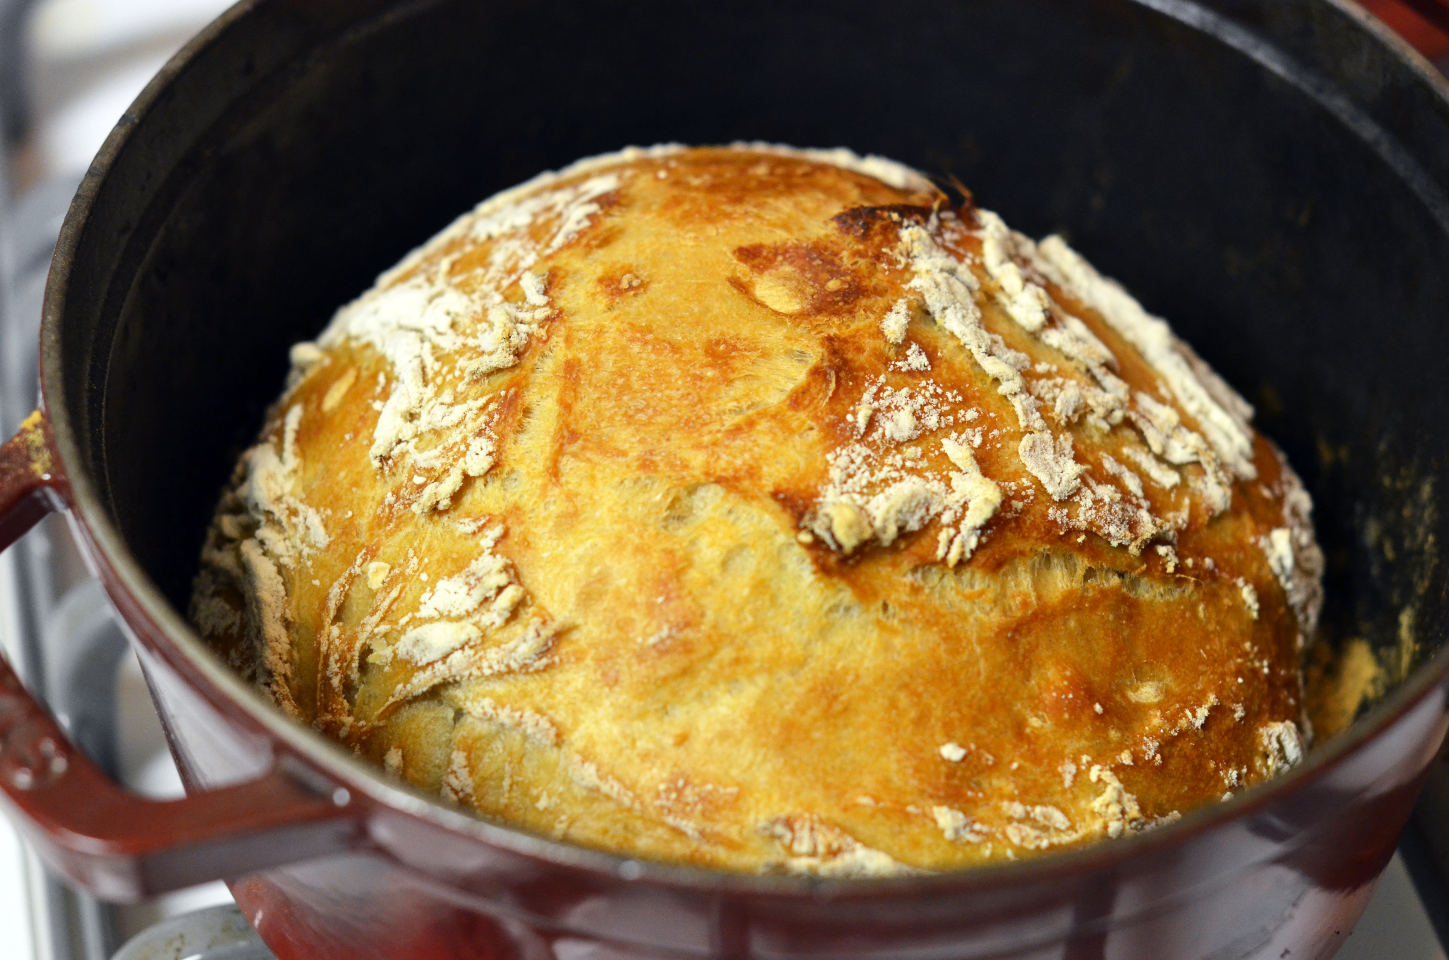
I heat my dutch oven, lid-off, for 10-15 minutes to bring it up temperature. Once it is heated through, I flip the proofed bread out of its bowl and slash the top with quick strokes of a sharp knife or razor. Into the oven it goes, cooking for the next fifty minutes. With the dutch oven, I’ll remove the lid for the last 15 minutes or so, letting the top of the loaf turn a golden brown.
 CREDIT: Kirsten Tilleman
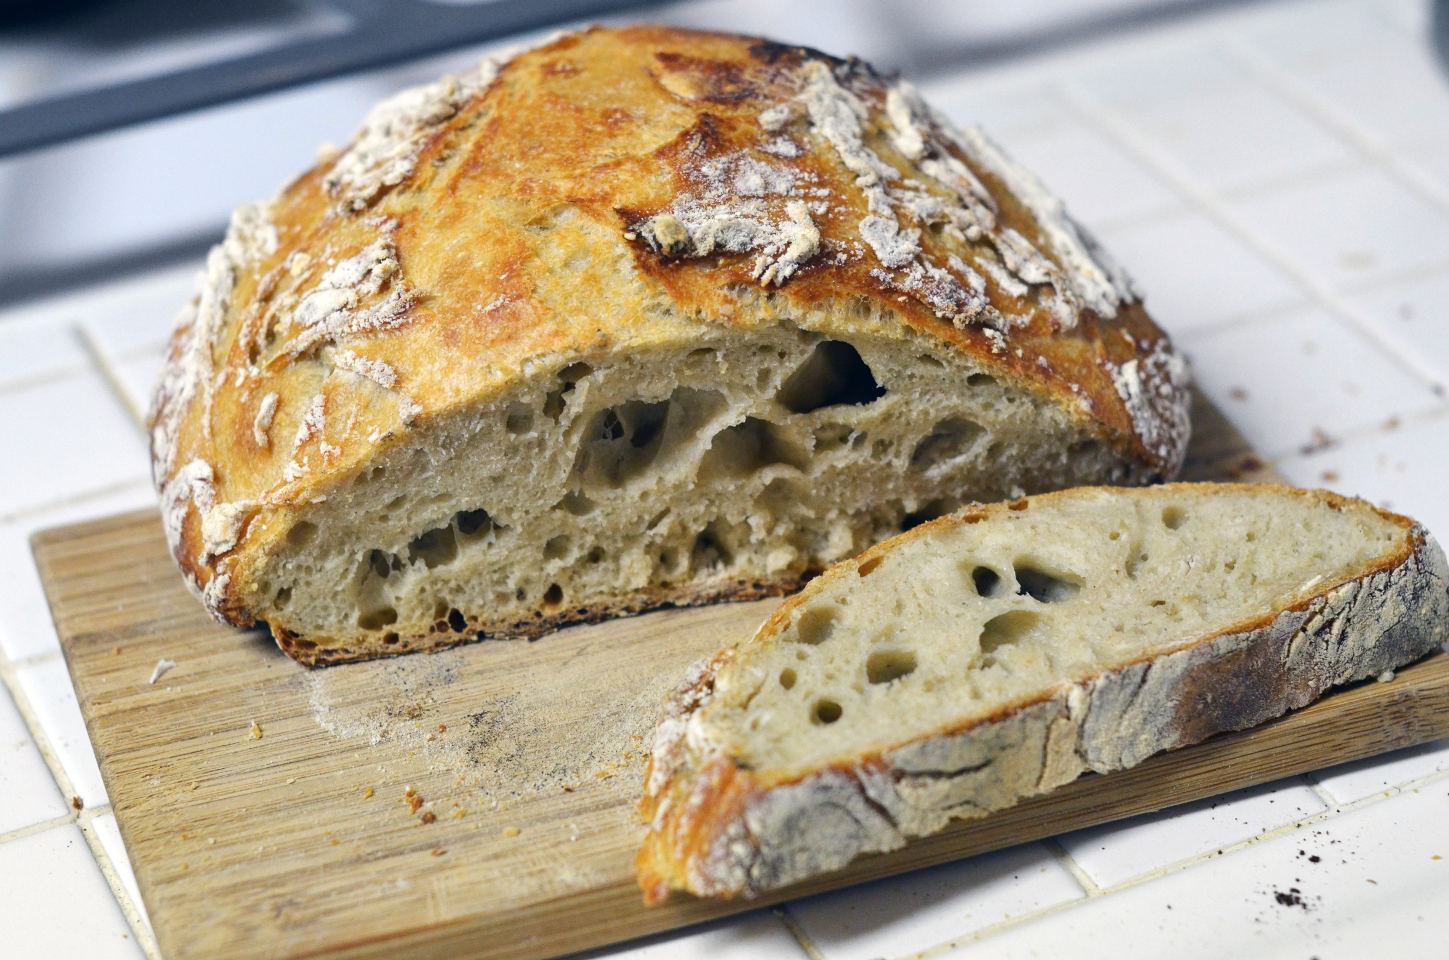
As the sun sets, the kitchen fills with the aroma of fresh bread. The steaming loaves sit on racks to cool, then are smothered in jam and passed through ‘quality control’–a delicious end to baking day!